Saturday, July 30, 2022

A New Ironing Surface

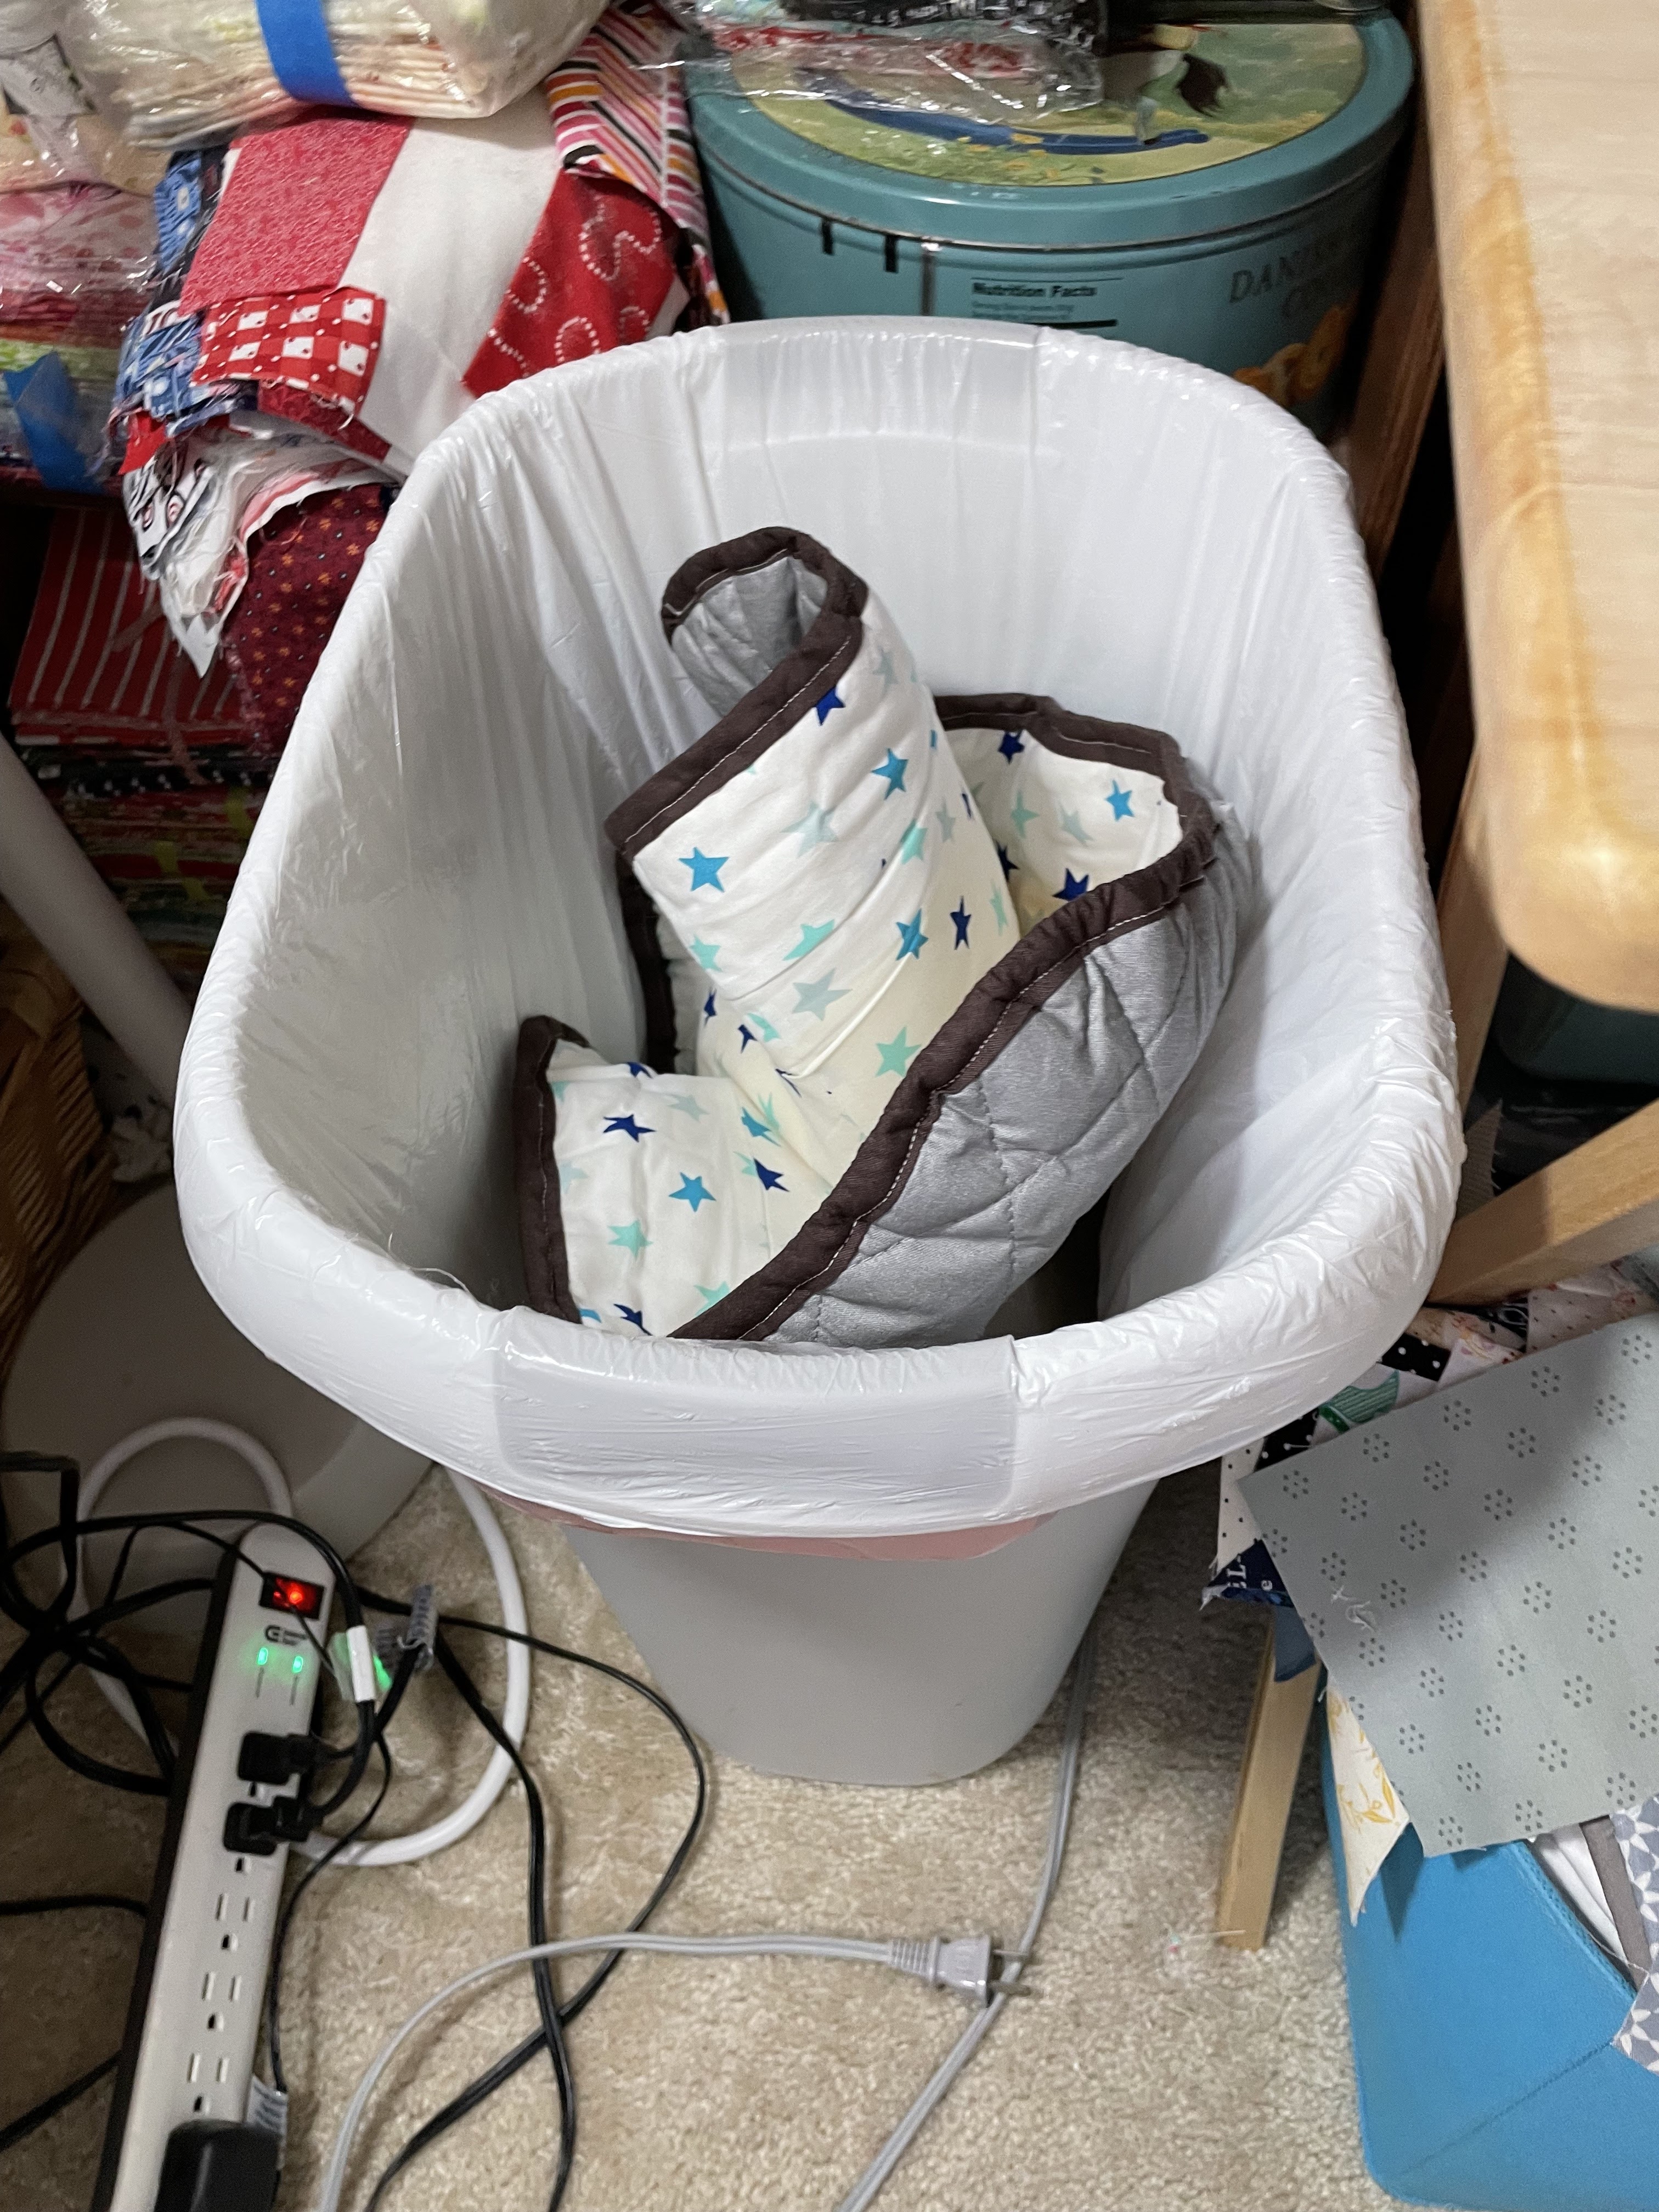
I don't have a lot of time to blog during the school year, but this summer hasn't been much better. We have been on the go since before school let out. Before school starts (in 3 days) I want to get a few posts done. This first one is my new ironing surface. As you can see from the photo, my old one was in sad, sad shape. Somehow, with my daughter, all three of the older grandkids, and myself using it, it disintegrated quickly.
The ironing surface itself is simply a $10 TV tray from Walmart. I came across this idea when a woman in my quilt guild brought it to a meeting one time. Genius! My full-size ironing board takes up way too much room. The TV tray sits right by the machine and allows me to press blocks - and even full size quilts - without getting up and walking across the room Floor space is at a premium in my sewing room, and this is perfect. I don't think I've had the full-size ironing board out of the closet in at least 3 years.
Since I made this cover several years ago, I thought it would be a good idea to "reverse engineer" the one I have, and then keep a record on the blog for next time. The top is ironing board fabric from Joann's. It's sold by the yard. I actually needed a piece about 22" x 18", so a half yard would do fine. Ironing board fabric has a heat protectant filler, but I added insulbrite the first time I made my ironing board. The ironing surface seemed a bit too "squishy" to get a really crisp press, so I left it out the second time I made a cover. I often use sheets as the backs of quilts, particularly when I can find them on sale. If I buy a sheet set, it means that I frequently have the pillow cases left over. Half of a pillowcase was perfect for the lining.
You will also need about 1-1/2 yards of 1/4" elastic. I considered reusing the elastic from the previous cover, but it was pretty stretched out, and since I have most of a bolt left from the 2020 mask-making frenzy, I decided to use new elastic.
Finally, you will need a package of bias tape, or about 2 yards of bias binding. I used to have dozens of packages of bias tape, but I used them for masks, so instead I repurposed some left over bias quilt binding I had made and not used.
To begin, I removed the old elastic from the cover and laid the cover flat on a new piece of ironing board fabric. I used the old cover to cut a rectangle.
I removed the seams from the pillowcase with scissors, and cut a rectangle the same size as the ironing board fabric. If you want a "pretty" fabric cover, this is the time to cut that as well. I chose not to do that because I find that the pretty fabric becomes a scorched mess much quicker than the ironing board fabric, and I don't want to have to change it more often than I do. If you like a decorative cover, you might make a separate cover with an elastic edge using just the decor fabric that could be changed out whenever it gets nasty. It might actually serve to protect the ironing board fabric and keep it looking nice longer.
Stack the layers together with the ironing board fabric on top. I used a cup to cut curves on the corners.
Using the cup as a guide, I just used my rotary cutter to cut the curves. (A new blade would be a good idea here.) Naturally, you could also mark the curves and cut with scissors.
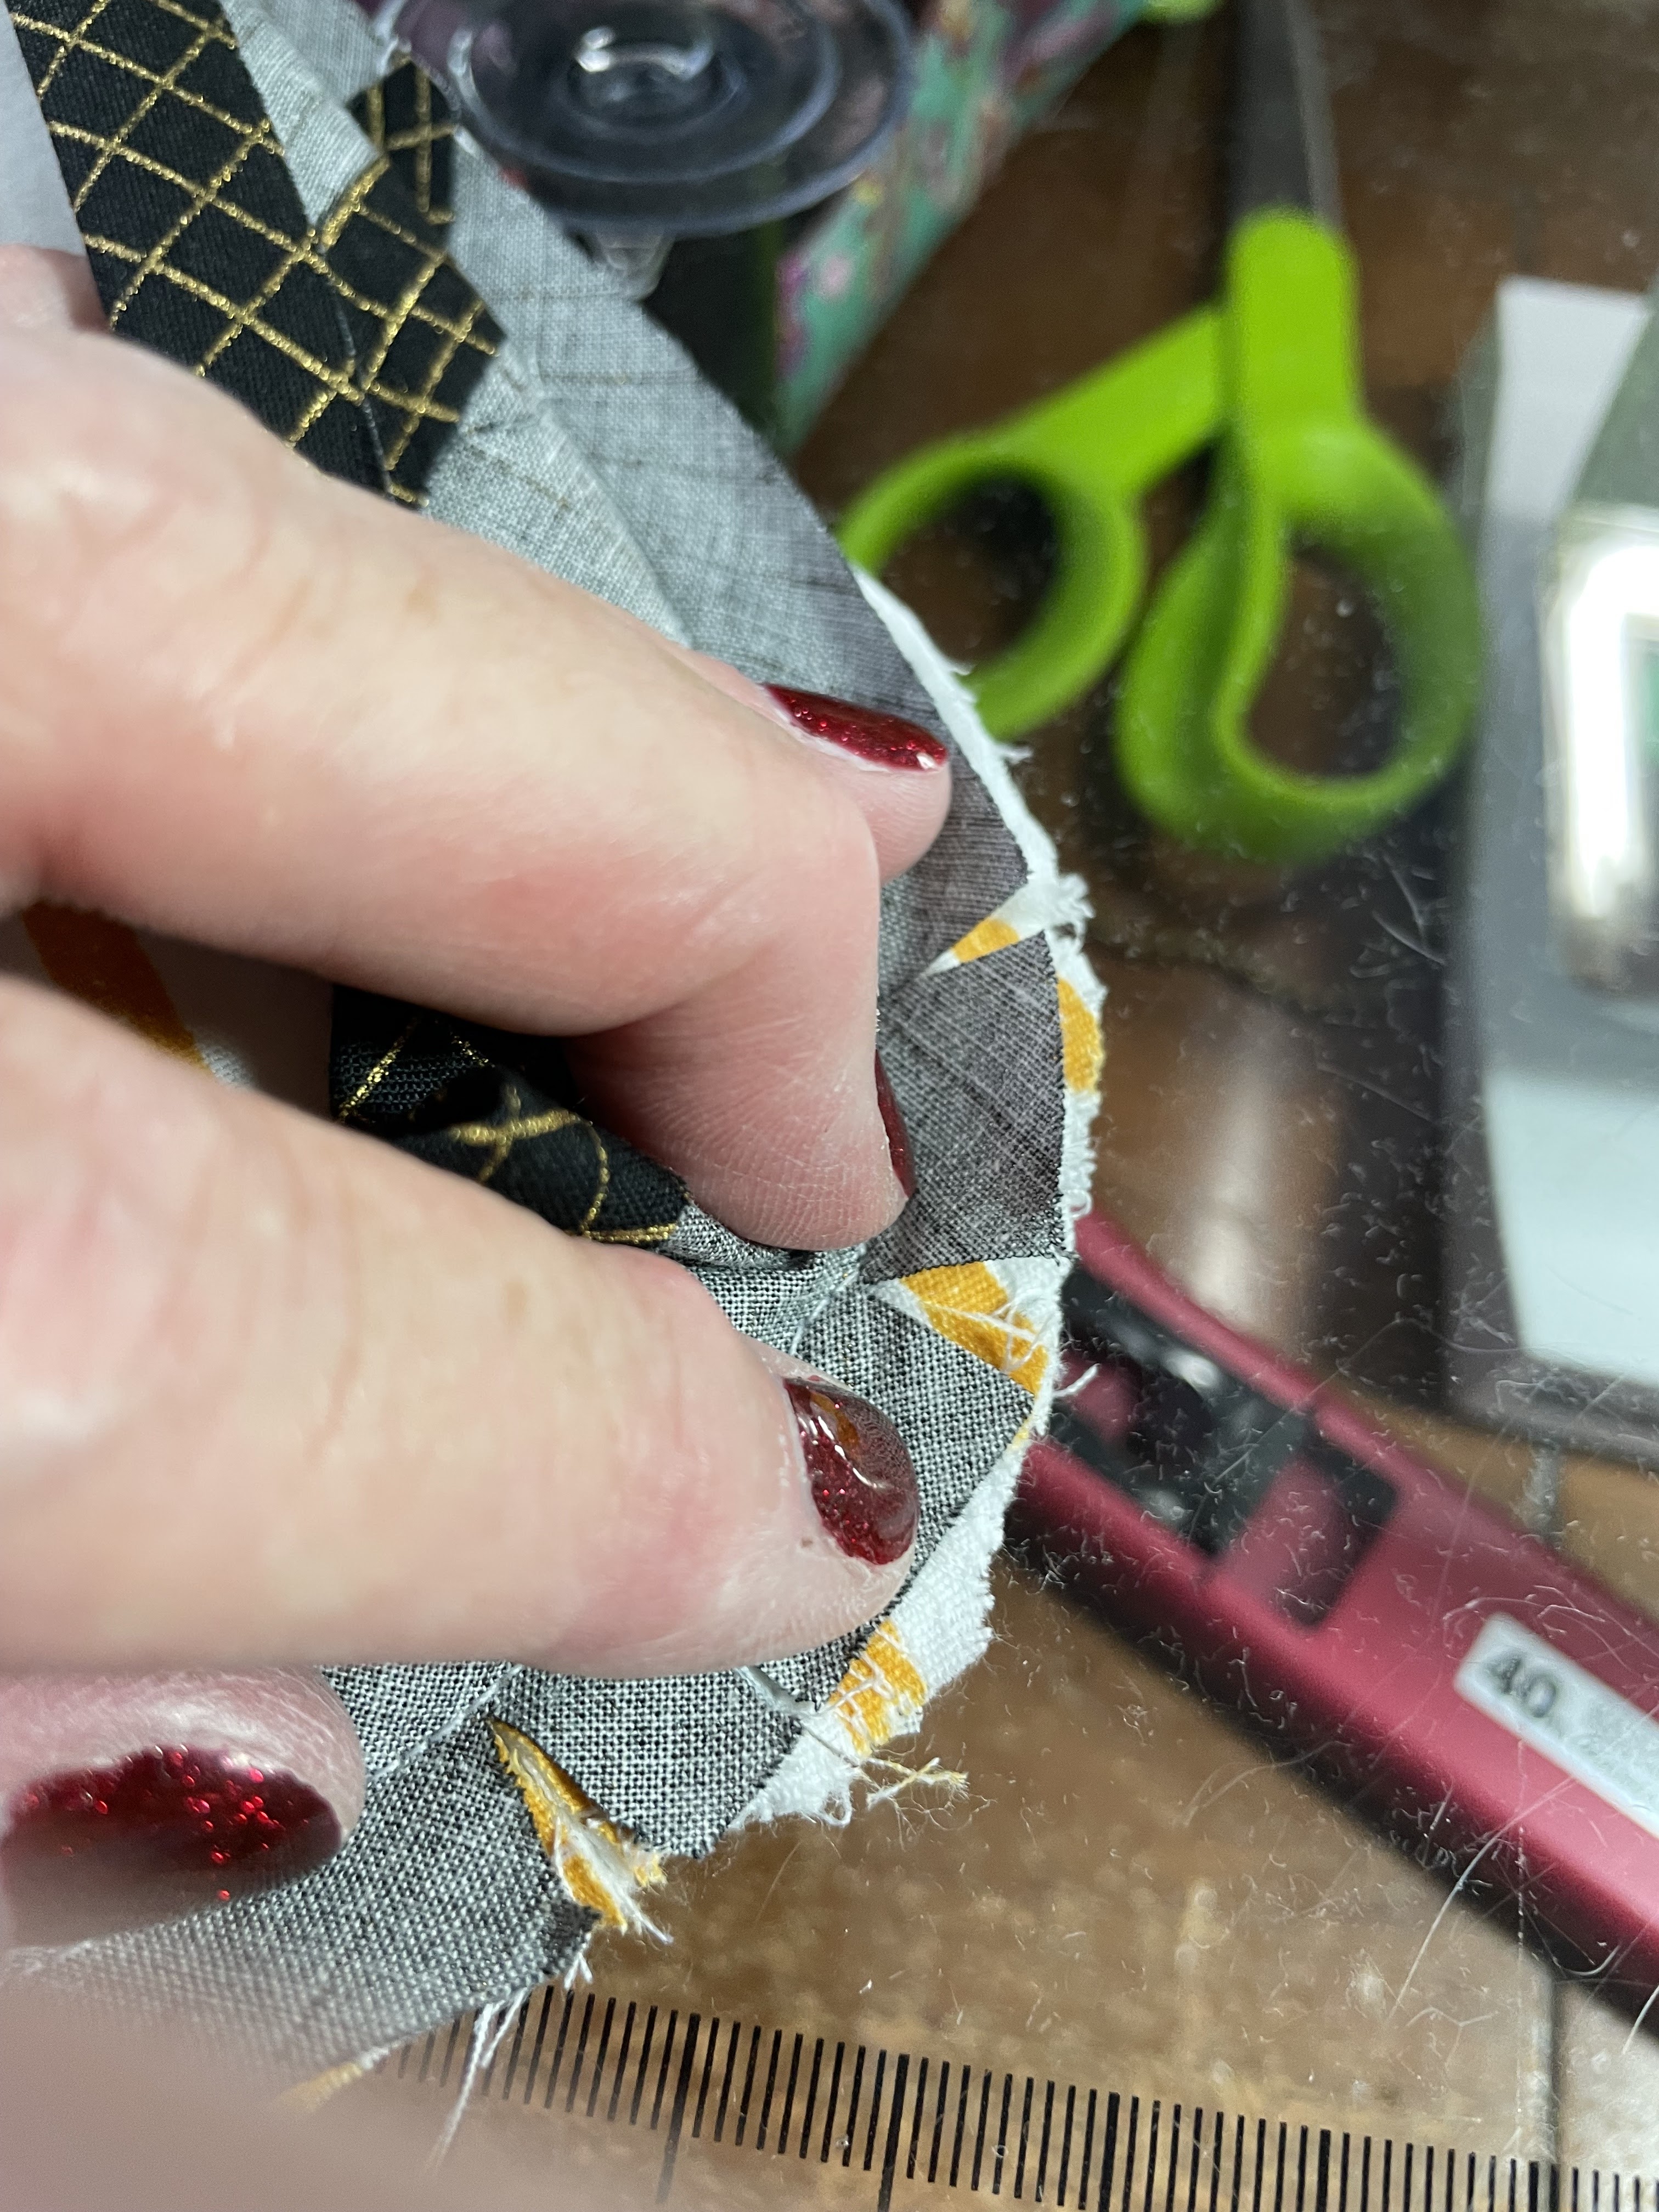
Pin all the layers of your cover in place and using your machine's widest zigzag stitch, zigzag around the outer edge of the cover to hold all the layers in place.
Fold over the short end of the bias tape about 1/2" and press. This will give your binding a nice, clean finish.
Next, fold the long edges of the bias tape to the middle and press again. Beginning on one short edge of the lining side of the cover, open the binding and stitch along the fold line. This edge takes some stress when you thread the elastic, so be sure to back stitch at the beginning of this seam. Although commercially purchased bias tape is made to be sewn all at once, because of the thickness of the ironing board cover, I spend less time "fixing" mistakes if I make this a two-step process.
When you come to the point where you began, add about 1/2" to 3/4" of an inch and cut the bias tape.
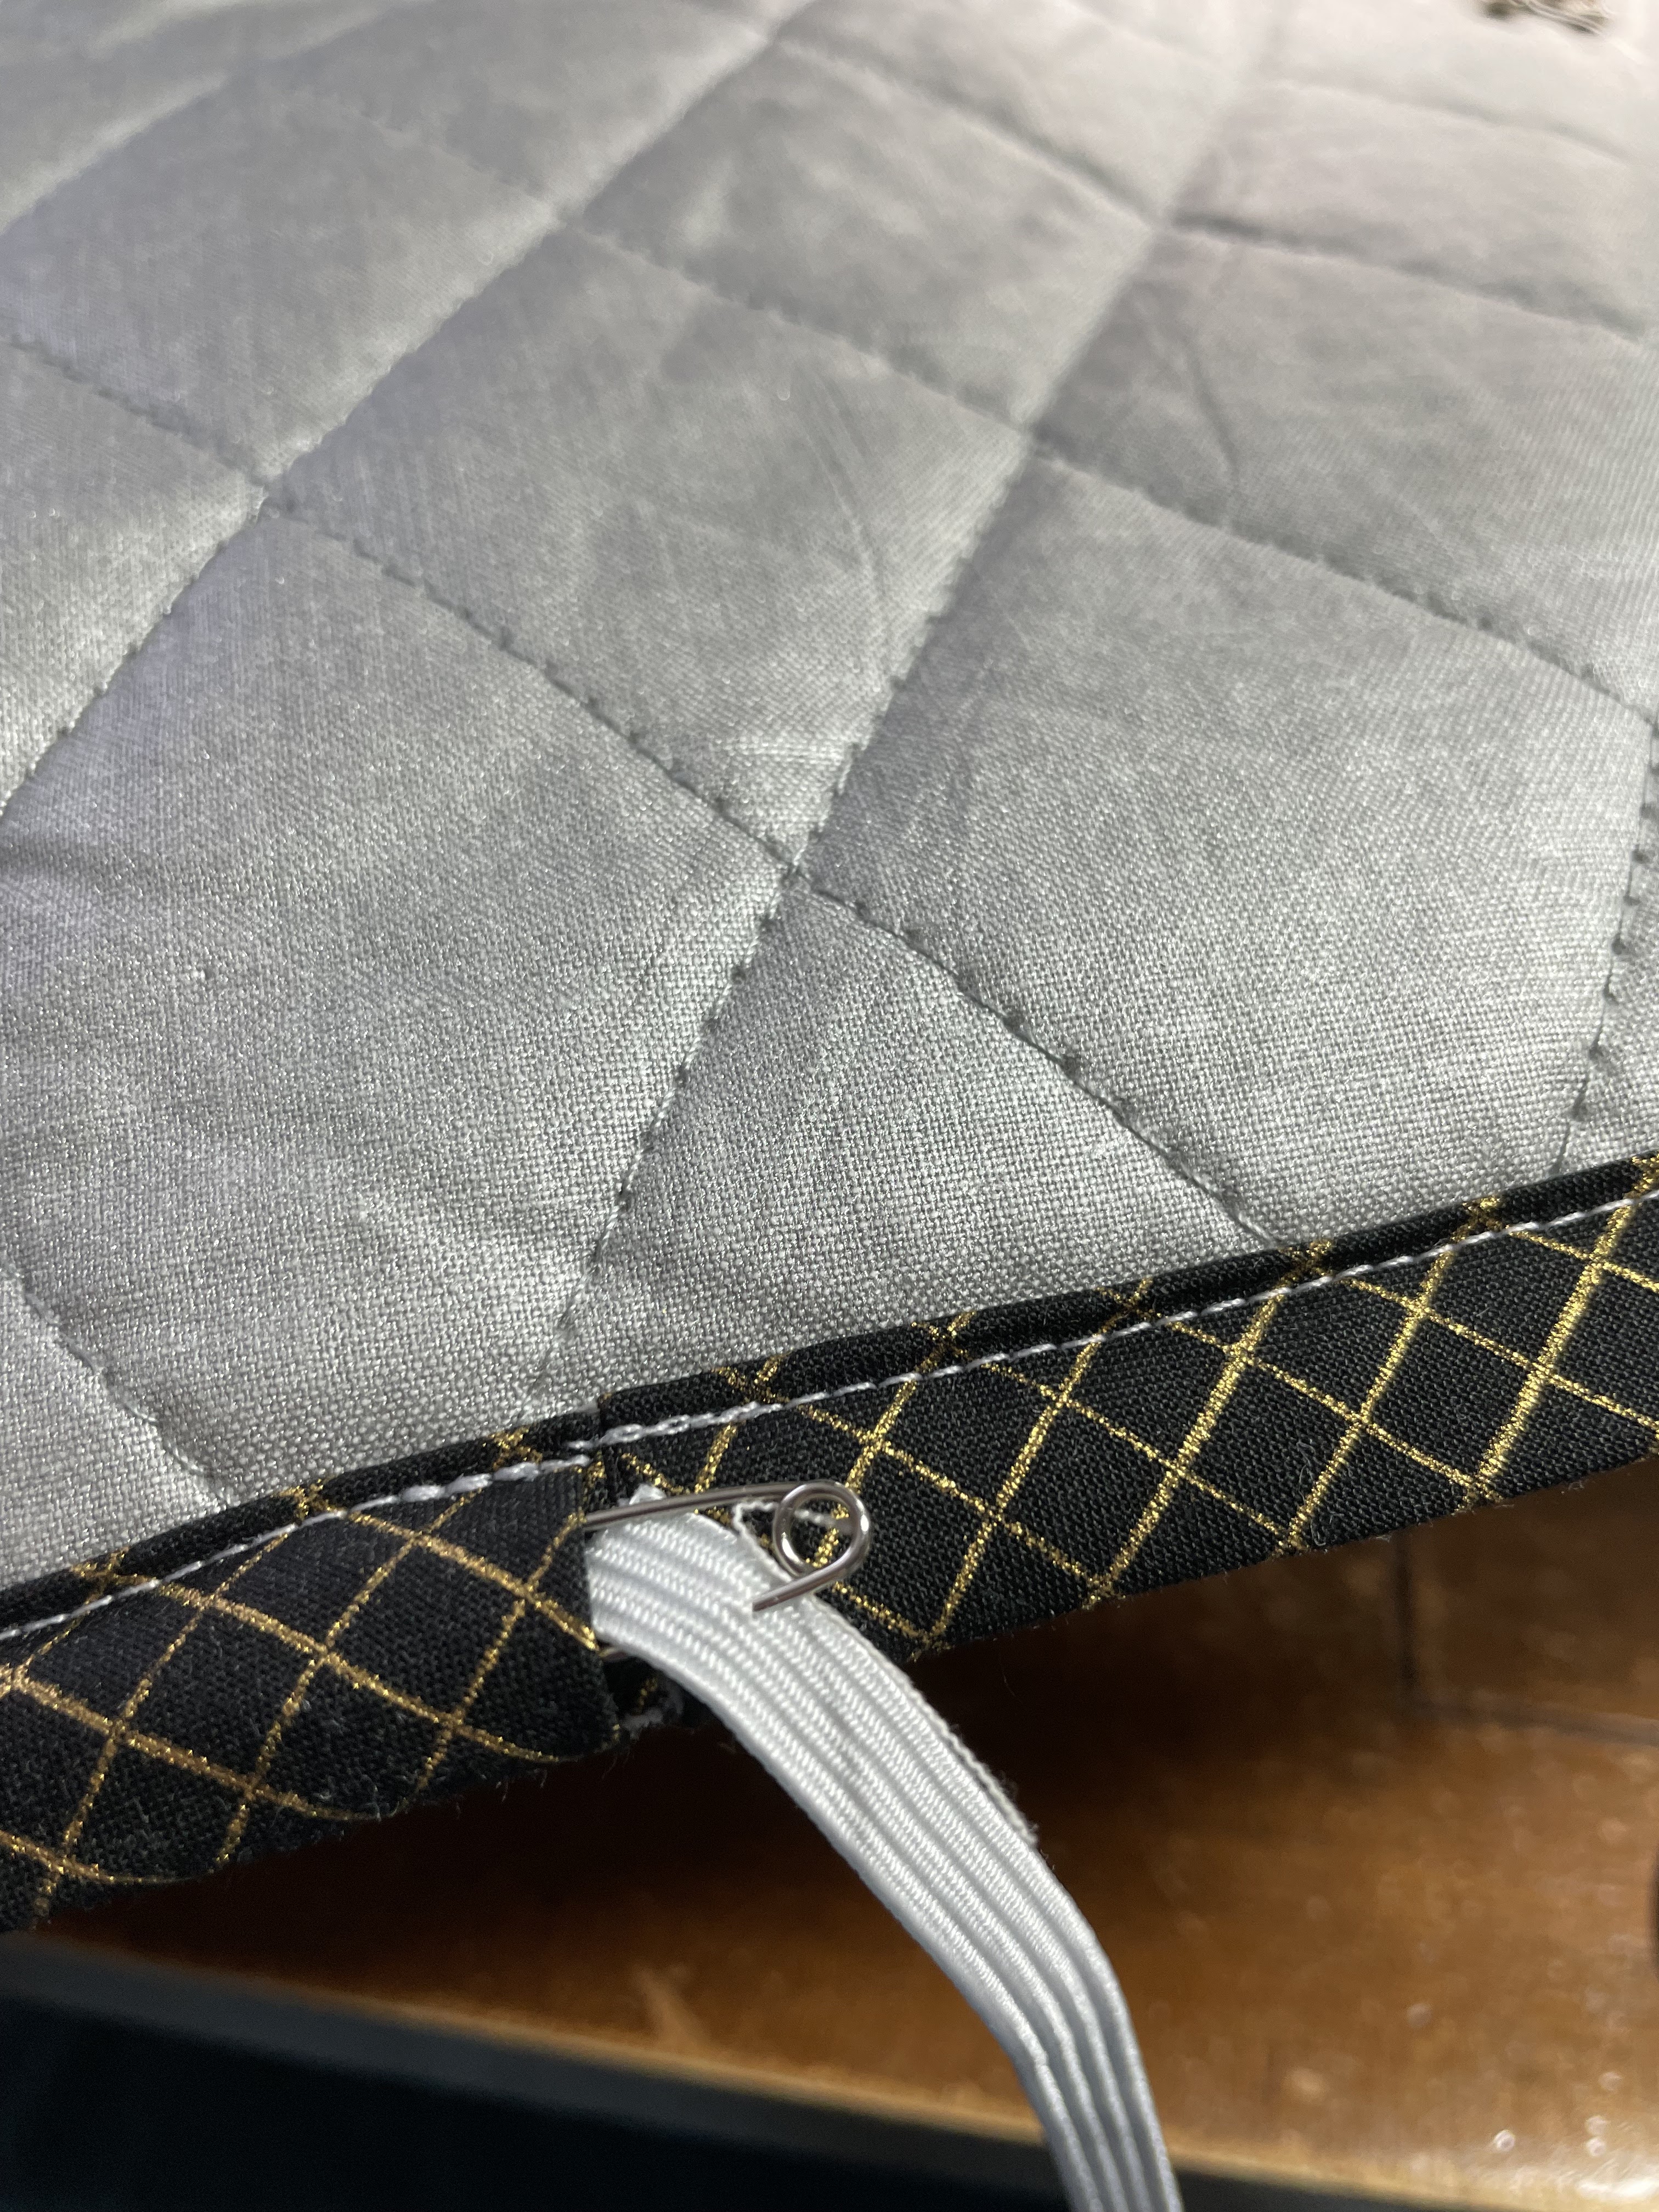
Fold the edge in until the two pieces just meet. This will be the opening for your elastic casing. It makes the elastic accessible if you wish to loosen or tighten it later. Over the years, mine has needed few adjustments, but it is nice to have the elastic accessible. Again, since this edge gets some stress from the insertion of the elastic, be sure to back stitch at the end of the seam.
This seam is very thick. Clip the curves so your seam will lay nice and flat. Be sure NOT to clip the stitching.
Fold the bias tape to the front side and stitch it down just as you did on the back. Be sure the opening for the elastic casing is clear of stitching.
Insert the elastic through the casing using your favorite method. I used a large safety pin that I could feel easily through the fabric. The stretched-out elastic I removed from the old cover measured approximately 45". When I threaded the new elastic, I threaded it through the casing and pulled it tight and did not measure the actual length of the elastic I used.
Be sure you tie a knot at the end of the elastic before you begin threading it through the casing. When you get all the way around, remove the pin and tie a knot in the other end. This will prevent the elastic from pulling through as you work with it.
I put the cover silver side down on my table top, and placed the TV tray on top of the lining. I pulled the elastic tight around the TV tray until it was snugged down onto the surface. Then, I tied a bow in the elastic to hold it tight.
Voila! A brand spanking new cover for my ironing board.
It felt kind of good to throw the old one in the trash. ;)

Saturday, August 7, 2021

Summer Break Projects - Part 5, Some Quilty Finishes

A couple of weeks ago, after I finished the Scraptastic quilt, I suddenly remembered that I had a whole pile of quilt tops that needed to be quilted, so I started digging through the bin where I keep them. I gathered a giant pile of quilts that were ready for finishing. In addition, I found some blocks that needed to be turned into quilts.
I found 40 of these Raspberry Kisses blocks from a block swap I did in 2017. They are beautiful blocks. I didn't get any of the ones I made back, so none of these are mine. It was a simple matter to put these together and make a quilt.
I also found these 10 blocks from a bee my quilt guild did - probably about the same time. As queen bee, I requeste feathers with bright colors and low volume backgrounds. Since I never made my two blocks, and most of these are so different, this one is going to take a bit more thought and prep to put it together. It is still on my design wall. We will probably revisit this one another day.
I took a day and went up to my church where there is lots of floor space where I can lay the quilts out flat and sandwich them. Sandwiching is my least favorite part of the quilting process. As I get older, sandwiching gets harder. My knees just hate crawling around on the floor, and I don't like pinning or spray basting. However, it is a necessary part of the process and has to be done, so I just have to get on with it every once in awhile. Quilts like this little dancing pinwheels baby quilt are easy to sandwich. Larger ones are more difficult. I ended up sandwiching - or partially sandwiching - 11 quilts. that day. I ran out of backs (I was using sheets) so I didn't get completely finished. Some of them came home partially sandwiched, and I had to piece some scraps together to get enough to back the quilt. It was tricky, but ended up going suprisingly well.
I actually don't mind quilting them on my domestic machine. I have a Bernina 750 which has a large throat, and makes simple quilting jobs pretty easy. I quilted the double diamonds quilt with pebbles - or maybe we should call them stones, since the pebbles are quite a bit larger than what we usually think of when we say pebbles.
I also managed to get one of the green wonky/improv log cabins quilted. I did a simple meander design on this one and it went pretty fast. I can usually do a throw quilt in 3 to 4 hours.
Of the 11 quilts I backed that day, I have finished 3 so far, - the dancing pinwheels baby quilt, this double diamonds quilt,
and the green log cabin. Since I can't do the project I had planned for "just before I go back to school," I hope I'll get a couple of others completed too.

Thursday, August 5, 2021

Summer Break Projects - Part 4 - A Bunch of Scrappy Quilts

Last year, in the midst of the Covid-19 mask-making, scrub-making chaos, I also finished a number of quilt tops. I frequently used the quilt blocks as a reward: "If you make 50 masks, you can make a quilt block." In addition, I was determined to clean out the scrap boxes, most of which were overflowing.
I started with the green basket. I have an online friend who goes by @simplegirlsimplelife on Instagram, who posted several times about how she uses her scraps to make scrappy log cabin quilts. I decided to follow her example.
These wonky/improv log cabin blocks go pretty fast, and I had not one, but TWO quilt tops made in a few days. That pretty well took care of the greens - for awhile.
Then I started on the pinks. I made another wonky/improv log cabin first.
Then I decided to branch out, and started making patchwork heart blocks.
This made a pretty fun quilt. Best of all, all of these are entirely out of my scrap bins. You can see from the top photo that I was working on the pinks in the midst of the mask chaos.
Later in the summer, after Abby made the quilt for her granny I used the scraps to make the double diamond quilt. I probably have enough scraps left from this bundle to make another quilt, but I'll save that for another day.
I made the butterfly quilt from random scraps too. Honestly, the more I look at this one, the less I like it, but maybe I will like it better when it's quilted. I saw the pattern online and couldn't wait to make it. It's not that it didn't turn out well, it's just... I don't know what exactly.
Then I made the Sunny Side Up quilt from a kit my daughter put together in her shop. (If you don't follow @a.craftyfox on Instagram, you're missing a visual treat. Her quilts, kits, and photos are so amazing. (She definitely did not get those skills from me!). This one wasn't using up scraps exactly, but definitely scrappy.
All this piecing last year - with not much quilting of the resulting tops - left me with a huge pile of unquilted tops. So, earlier this summer, I decided I'd better do something about that. Stay tuned.

Tuesday, August 3, 2021

Summer Break Projects - Part 3 - Dancing Pinwheels

Do you ever have reality staring you right in the face and almost miss it? I have known for several months that I needed to make a quilt for a friend who was going to have a baby boy this summer. I would think, "I need to order a bundle of blues from some fabric shop," and even go look for blue bundles, but I never actually ordered one. When my daughter began assembling squares for her scrappy quilt, she commented on how many scraps I have - particularly blues. I have two whole bins of blue scraps. Suddenly it hit me - I really DON'T need to order fabric. So I went through the bins and assembled some scraps, added some white from the bolt I keep in the stash, and started making pinwheels.
When I got them up on the design wall, I thought, "That's pretty boring. They need sashing." I decided to do sashing on two sides and rotate the blocks, creating a "Dancing Pinwheels" design. I decided I liked it better.
It didn't take long to quilt this 48" x 48" baby quilt. I quilted loops - which reminded me of the wind - and it went very fast. I bound it in the same blue stripe I've used so often lately (I'll be very sad when I run out!) Even better, the quilt was scrappy, and therefore "free," which makes me happy. And the finished quilt was gifted this past weekend.

Sunday, August 1, 2021

Summer Break Projects - Part 2 - A Limerick Quilt

In early March, my daughter put together a Quilt-and-Read Along on Instagram. I had plenty of greens and lots of low volumes, and when Spring Break began, I was anxious for a project that did not include Google Meet, or screens of any kind. I started cutting. By the end of Spring Break, I had all the blocks made - or thought I did. And best of all, since I had the fabrics stashed already, this quilt (in my mind, at least) was "free".
Right before the end of the school year, I managed to get most of the blocks put together. This pattern looks so complicated, but when you follow Amanda's Limerick Pattern it's super easy. She gives great tips and directions for making this process go fast.
Once I finished the scrappy quilt, I decided the next job was to finish the Limerick quilt. The top was together after all, and it only needed borders. Unfortunately, whereas I thought I had all the blocks made, I had been wondering why I has so many low volume rows left over. The answer was that I hadn't made ANY of the low volume border blocks, and hadn't put the outside row of low volumes on the green blocks. Oops. And even worse, I had allowed the grands to create with the LV strip sets, and had even taken some apart for my scrap quilt, totally ignoring that voice in my head that said, "Are you sure???" It turned out OK, of course. I have bins and bins of scraps, and an entire 1 cubic foot bin of low volume scraps. Scraps were thereby obtained, cut up, sewn together, and placed in the correct positions on the quilt, and a (very large) quilt was born. It is currently sandwiched and awaiting its turn to be quilted. I love these greens. They are so fresh and clean. And the low volumes add so much dimension. If you want a tutorial on how to choose low volumes for your next project, check out @a.crafty.fox on Instagram. It's in her stories.

Friday, July 30, 2021

Summer Break Projects - Part 1 - Two Finishes and a Scraptastic Quilt

As we all know, this past school year was a difficult one, and although my Harry Potter quilt came back from the quilter in December, it was summer break before I managed to get it bound.
I also got my Single Girl quilt back from the quilter this spring. I decided I wanted to make this one in 2011, and actually started it in 2014. I put it together in 2017, I think, and just managed to get it to the quilter this year when I saw someone else post a photo of their Single Girl on Instagram. It was obvious that if I waited to quilt it myself it would be another 10 years. There was just something very intimidating to me about this quilt from start to finish. This one got bound at the beginning of summer. I hope to get the quilt husband to let me take some photos soon.
My daughter made this stunning scrap quilt this spring, and then started another one while she was visiting. Nothing would do than I try my own version when she left. It helped alleviate the separation sadness.
I put these first 4 blocks together the day she left. It was fun putting the fabrics together and deciding just what went where. At first, I was very cautious, sticking with combinations I was certain would work.
But as I worked on it, I got a little more daring.
With each block I really began to feel the creative juices flow like I haven't felt in a long time. This was a great exercise in color theory and creativity.
It took a week, but I'm really happy with how this one turned out.